1 week before lesson 4, we had to start feeding our own levain.
Day 1: Sticky and stiff.
Day 2: I woke up with a shock to see the levain overflowed its own container and it STINKS TOTALLY! Spent a good 15mins clearing up the mess at 7am..crap~ anyhow, I brought the container to my office as the levain had to be fed every 12 hourly.
This is how it looks at the end of Day 3 (after I fed it): It stinks less but it still stinks ~_~
Day 4: It smells much better already, none of the decaying smell exists.
Day 7: The night before lesson 4, there's activity going on =D I will have my own levain to make my bread tmr.
Some of the observations on the smell and the schedule for feeding my levain.
Day 1: Nothing much.
Day 2: Foul smelling, decaying. Lots of activity.
Day 3: Something is still rotting. Lots of activity.
Day 4: Yogurt like smell. Not much activity.
Day 5: Same as Day 4.
Day 6: Sourish. Lots of activity
Day 7: More sour than Day 6. Lots of activity
Before lesson 4 started, we saw several people had levains that looked different from the others. It turned out that some people thought that the mixture was rotting on Day 2/3 and threw it away. Therefore, they went through the process from Day 1 to Day 3 again and again, thinking that something must be wrong...
"How can the levain smell like rotting crap?" Well, the truth is it really did. And all we had in our mind was to just continue feeding it as per instructions haha~
So what did we do right? K and I concluded it could have been due to what we did:
1. Washing the container with detergent before using it
2. Using oxygenated water on Day 1/2 (as we didn't have dechlorinated water)
3. Wash our hands with dettol liquid soap before feeding the levain each time.
In the end, K gave part of his Alkie (the pet name for his levain) to 2 other class members before the start of Lesson 4, so that they have some levain to work with.
Today's breads to be made:
1. Pain Au Levain
2. Flaxseed Rye Bread
3. Ciabatta
We started off with the Pain Au Levain, the recipe is really simple with wheat flour, bread flour, water, levain, yeast and salt. Yeast is used as we do not have 3hours to proof this bread in class.
Each of student is expected to knead the ingredients together with their own levain to produce this bread.
I can truely call this YY's bread. It is made from my levain (hmm~ the dead cells from my hands went into the levain) and I kneaded it on my own. I wonder why my dough looks kind of small compared to others >_<
K's dough.
After 1 hour of proofing, YAY they grew which means the levain worked!
Meanwhile, another group started making the Flax Seed Rye bread.
Dividing time.
Rounded
And placed in the couche.
Our group of 4 unanimously decided to volunteer for the making of the Ciabatta bread. The words that Judy said about handling Ciabatta dough kept ringing in my ears, "You got to treat it like a baby..." No pics on that cos we were so busy. Finally, the dough was shaped and placed onto the canvas for proofing.
Right before baking, Hafizh told us to use our fingers to make the holes in the Ciabatta dough. This is what gives us the irregular air pockets in Ciabatta.
Freshly baked Ciabattas. This bread is the 2nd reason why K is excited about this Artisan Bread Course =D
Hafizh told us that the irregular pockets are obvious only when you slice a Ciabatta lengthwise across.
Cross sectional look for Ciabatta.
Our hand knead bread, . Look at the height difference, seems like my levain isn't very strong.
My bread smells nutty and sweet and had a sourish after taste. Whereas K's bread smell kinda sourish and tasted like corn flakes. Haha~ the wonders of using your own levain, you produce individual unique breads.
Flaxseed bread, finally done.
Saying goodbye to my levain, sorry you got to go cos I won't be able to feed you everyday and only use you less than once a month.
As for K, his alkie is still surviving as of 31st Dec 2009.
Artisan Bread Course - Lesson 4 (13/09/09)
Artisan Bread Course 3rd Lesson (6th Sep)
Today's lesson is going to be exciting because we are going to make our own levain. This is the main reason why K is excited about this Artisan Bread Course actually.
The breads to be made for today's lesson:
- Brioche (High butter content bread which requires freezing of dough else it will melt in our hands)
- Pain de Paysant (Simple bread for peasants)
- Multigrain
We arrived at Creative Culinaire pretty early and saw this huge pile of packed flours which is to be distributed to us to cultivate our own levain.
The tart mould and raspberries are part of the brioche bread we are going to make later.
The brioche dough was made on the day before by Hafizh(instructor) because we will not have enough time if we were to do this bread during the short 5~6hours lesson.
As the result, Hafizh took out the frozen brioche dough he made and the rest of us divided and shaped it.
This design is a traditional shape called Brioche à tête.
Next, we spread some hazelnut cream over the brioche dough. This bread is to be put into the paper holder and proof/baked as a loaf.
By right, this loaf is supposed to be twirled nicely but apparently my dough was too long and as the result it looks squashed ~_~ but K's look much nicer.
The remaining dough was rounded then filled with custard + raspberries. Before baking, a heart shaped sweet cookie dough was placed on top of the bun.
The end result:
Gosh our tete is fugly -_-"
Close up on the custard raspberry brioche bun.
The inside: Seems like the raspberry melted into the custard. And its really sour >_<"
The hazelnut brioche loaf.
There were leftovers for this loaf, why? I wonder who didn't take her/his share.
Earlier on right before baking, everyone placed a piece of paper with their names onto the brioche loaf. Well, it seems like the bread grew in the oven and many people couldn't find their loaf so K convinced a few aunties to JUST TAKE DON'T CARE SO MUCH but some were still desperately trying to find their name amongst the 34 loaves of brioche bread.
However, our papers were visible so here's our ugly brioche loaf. Don't be deceived by its look..
This bread is DELICIOUS!
At the same time, the class was also doing the multi grain dough. We learnt something new today regarding sticking of seeds onto the dough.
Place a moist cloth on the table, roll your dough on it. Then roll the moist part of the dough into the grains and the grains will STICK ONTO your bread.
Previously, when K wanted to do this sesame seeds bread stick and the sesame seeds simply fell off during the course of baking, now we know why.
Whole load of multigrain bread and it was really fragrant.
Pain de Paysant was in the making too.
To make this pattern, first use the roller to make a cross. Make sure its pressed down real hard until a clear cross is seen. Then gather the dough and place it into the couche to proof before baking.
Bottom 2 pics: Top view(left) and bottom view (right)
Cross Section of the Pain de Paysant.
Closeup for the multigrain bread.
The cross section for multigrain bread. I am not a lover of grains but this bread smells really great with all the seeds/grains.
Ahh~ Finally, the Hazelnut Cream Brioche Loaf.
Soft, fluffy, sweet, crunchy and buttery NOM NOM~ If I do not know about how much fat is inside this dough, I will probably eat one whole loaf on my own.
Towards the end of the lesson, Hafizh went through on how to grow our own levains before next week's lesson so that everyone can make a bread using their own culture. And you know what this means? Everybody's bread is gonna unique cos everyone's culture is going to taste/smell different.
Our very own levains and for the next 7 days we must feed it conscientiously every 12hourly. Let's hope we succeeed *fingers crossed*
Artisan Bread Course 2nd Lesson (30th August)
The 2nd lesson was kind of hands-off cos the breads to be made were mixed by 2 groups while the rest watched on. It was until the divide and shaping stage when we got to touch the dough.
The 3 breads to be made:
- Baguette using poolish method
- Baguette using sponge method
- Cranberry Raisin Bread
The cranberry raisin dough was divided according to the number of students in the class and everyone had a hand in shaping the breads.
After the baguette was divided and shaped, its time to put them into the linen cloth so that they can maintain their shape for the final proofing stage.
Raisin breads resting in the couches.
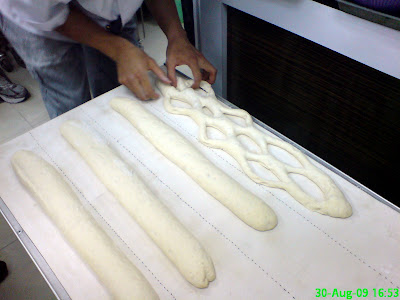
Another variation for the baguette..interesting pattern.
By the 2nd lesson, we were starting to appreciate breads with bold bake(darker color) as they have better tasting crust.
After the baguettes have cooled, Hafizh took out a pack of baguette from Brand X, sliced it across and passed it around. He told us to smell it. Everyone took a sniff and had this EWWW look on their face because the bread smelled like overfried french fries! This is what we have been buying commercially OMG~
Hafizh started comparing the high hydration baguettes we make VS the commercial products that do not even smell/look like a baguette.
The crumb for our high hydration baguette. After tasting baguettes made from both poolish and sponge method, we actually found that the sponge method baguette tasted better O_O
Whole load of Cranberry and Raisins bread..
Looks good~
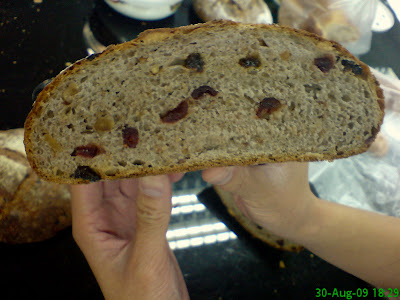
Cross sectional view.


